
Retaining walls are one of the most effective ways to stabilise sloped land, prevent soil movement, and create usable outdoor areas for landscaping, driveways, garden beds, and pathways. But when the ground is under pressure—especially with heavy rainfall, loose soil, poor drainage, or a steep slope—a standard wall can fail if it isn’t properly reinforced.
That’s where steel supports (also called steel posts, H-beams, galvanised posts, or C-channels) come in. They act as the wall’s structural spine, increasing strength, improving alignment, and helping the wall resist long-term movement.
Whether you’re doing a DIY build or working with a contractor, this guide breaks down how to build a strong retaining wall using steel supports, the key materials you’ll need, and the construction steps that lead to a safer, longer-lasting result.
Why Use Steel Supports in Retaining Walls?
Steel posts—most commonly galvanised H-beams (for sleepers) or C-channel posts (for end sections and corners)—are designed to handle high loads and keep the wall straight as soil pressure builds over time.
They’re especially popular for:
- Concrete sleeper retaining walls
- Timber sleeper walls that need extra rigidity
- Segmental systems that benefit from strong vertical framing
- Sites with high water exposure or reactive soils
✅ Benefits of Steel Supports
Superior load-bearing strength
Steel posts help resist lateral earth pressure, which increases dramatically as wall height and moisture levels rise.
No rotting, warping, or termites
Unlike timber posts, steel supports don’t degrade from pests or moisture exposure (especially when galvanised or coated).
Ideal for taller walls and high-pressure zones
Steel is commonly recommended for walls over ~600mm high or where there’s extra load (slopes, driveways, nearby structures, or poor drainage).
Long service life with corrosion protection
Galvanised steel (and powder-coated options) helps prevent rust and extends lifespan, particularly in wet environments.
Cleaner installation and straighter walls
Steel posts keep sleepers aligned and make it easier to build a neat, consistent wall—especially with modular sleeper systems.
Planning Your Retaining Wall (Before You Start Digging)
A strong retaining wall starts with good planning. For a comparison of materials and structural performance, see our guide to steel vs concrete retaining walls. Before construction begins, take time to assess the wall height, site conditions, drainage needs, and the materials you’ll be using. This step helps you avoid common failures like leaning, cracking, poor water control, and costly rebuilds later.
1) 📏 Wall Height (Engineering + Approval Considerations)
Wall height plays a major role in both structural requirements and whether you’ll need approvals.
- Walls over 1 metre often require council approval and engineering certification in many regions.
- Taller walls hold back more soil, which increases lateral ground pressure and the risk of movement over time.
- Even shorter walls may need approval if they’re supporting a driveway, close to a boundary, or carrying extra loads.
Steel supports are especially useful for retaining walls between 600mm and 2.4m, because they provide the strength needed to resist bending, shifting, and long-term soil pressure.
✅ Pro tip: If your wall is tall, close to a structure, or holding back a steep slope, it’s worth confirming local requirements before you build.
2) 🌧️ Soil Type & Drainage (The #1 Cause of Wall Failure)
Your retaining wall is only as reliable as the ground behind it. Different soil types hold and release water differently, which affects both pressure and drainage design.
Before building, identify the soil type:
- Clay soil: holds water, drains slowly, expands and contracts
- Sandy soil: drains faster but can shift and wash out
- Loam soil: more stable but still needs proper drainage
No matter what soil you have, you must ensure water won’t build up behind the wall. Trapped water creates hydrostatic pressure, which is one of the most common reasons retaining walls fail (even when the wall materials are strong).
To reduce pressure behind the wall, plan for:
- gravel backfill
- geofabric separation
- ag pipe drainage with a clear outlet
📌 Important: A wall can be perfectly built and still fail if water has nowhere to go.
3) 🧱 Wall Materials (Choose the Right System)
Steel supports are commonly used with several retaining wall materials because they create a strong vertical framework that keeps everything aligned and secure.
Steel supports work especially well with:
- Concrete sleepers (very common for modern retaining walls)
- Treated timber sleepers (use H4 rated or higher for ground contact)
- Natural stone or masonry blocks (often used in combination with reinforced systems)
Your material choice affects:
- post spacing
- footing size
- drainage requirements
- overall wall weight and handling
🧰 Materials & Tools You’ll Need
Having the right materials upfront makes installation faster, cleaner, and safer—especially when working with steel posts and heavy sleepers.
✅ Materials
- Galvanised steel posts (H-posts, C-channels, or universal beams)
- Retaining wall sleepers (concrete, timber, or composite)
- 20MPa concrete mix (for post footings)
- Crushed rock or gravel (for drainage backfill)
- Geofabric or drainage mat (prevents soil clogging drainage gravel)
- Ag pipe (for drainage at the base of the wall)
- Drainage scoria or blue metal (ideal for high-flow drainage zones)
🛠️ Tools
- Post hole digger or auger (for steel post holes)
- Spirit level + measuring tape (for alignment and spacing)
- Shovel and wheelbarrow (excavation and concrete handling)
- String line and stakes (keeps the wall straight)
- Power drill (mainly needed for timber sleepers or fixings)
- Safety gear: gloves, goggles, and steel-toe boots
Step-by-Step: How to Build a Retaining Wall with Steel Supports (Steel Posts + Sleepers)
Building a retaining wall with steel supports (steel posts / H-beams / C-channels) is one of the strongest ways to retain soil, prevent erosion, and create level ground for landscaping. Steel-supported retaining walls are especially popular in Australia because they handle wet conditions, reactive soil, and heavy ground pressure far better than timber-only systems.
Below is a clear, SEO-friendly step-by-step guide you can follow for a long-lasting result.
✅ Step 1: Mark and Measure Your Retaining Wall Layout
Start by setting out your retaining wall line so the wall stays straight, level, and properly aligned from the beginning.
What to do:
- Set your wall line using a string line and stakes
- Mark the start and end points clearly
- Check your levels (especially if the wall will be stepped)
- Mark post hole positions along the string line
Typical steel post spacing:
Most sleeper retaining walls are spaced at 2m centres for standard sleepers, but spacing can vary depending on sleeper type, wall height, and load conditions.
📌 Tip: Take time here—accurate set-out prevents the “wavy wall” look and makes sleeper installation much easier.
✅ Step 2: Dig Post Holes (Footing Depth = Wall Strength)
Your wall is only as strong as its post foundations. Steel posts must be anchored deep enough to resist soil pressure pushing the wall forward.
General post hole guidelines:
- Dig holes approximately 600–900mm deep
- Go deeper for taller walls, soft soil, or high-load areas
- Hole width should be 300mm+, allowing room for concrete around the post
Depth and hole size will vary based on:
- wall height
- soil type (clay vs sand)
- drainage conditions
- slope severity
- nearby loads (driveways, structures, fences)
📌 Best practice: If you’re unsure, it’s better to overbuild the footing than underbuild it—most failures start at the base.
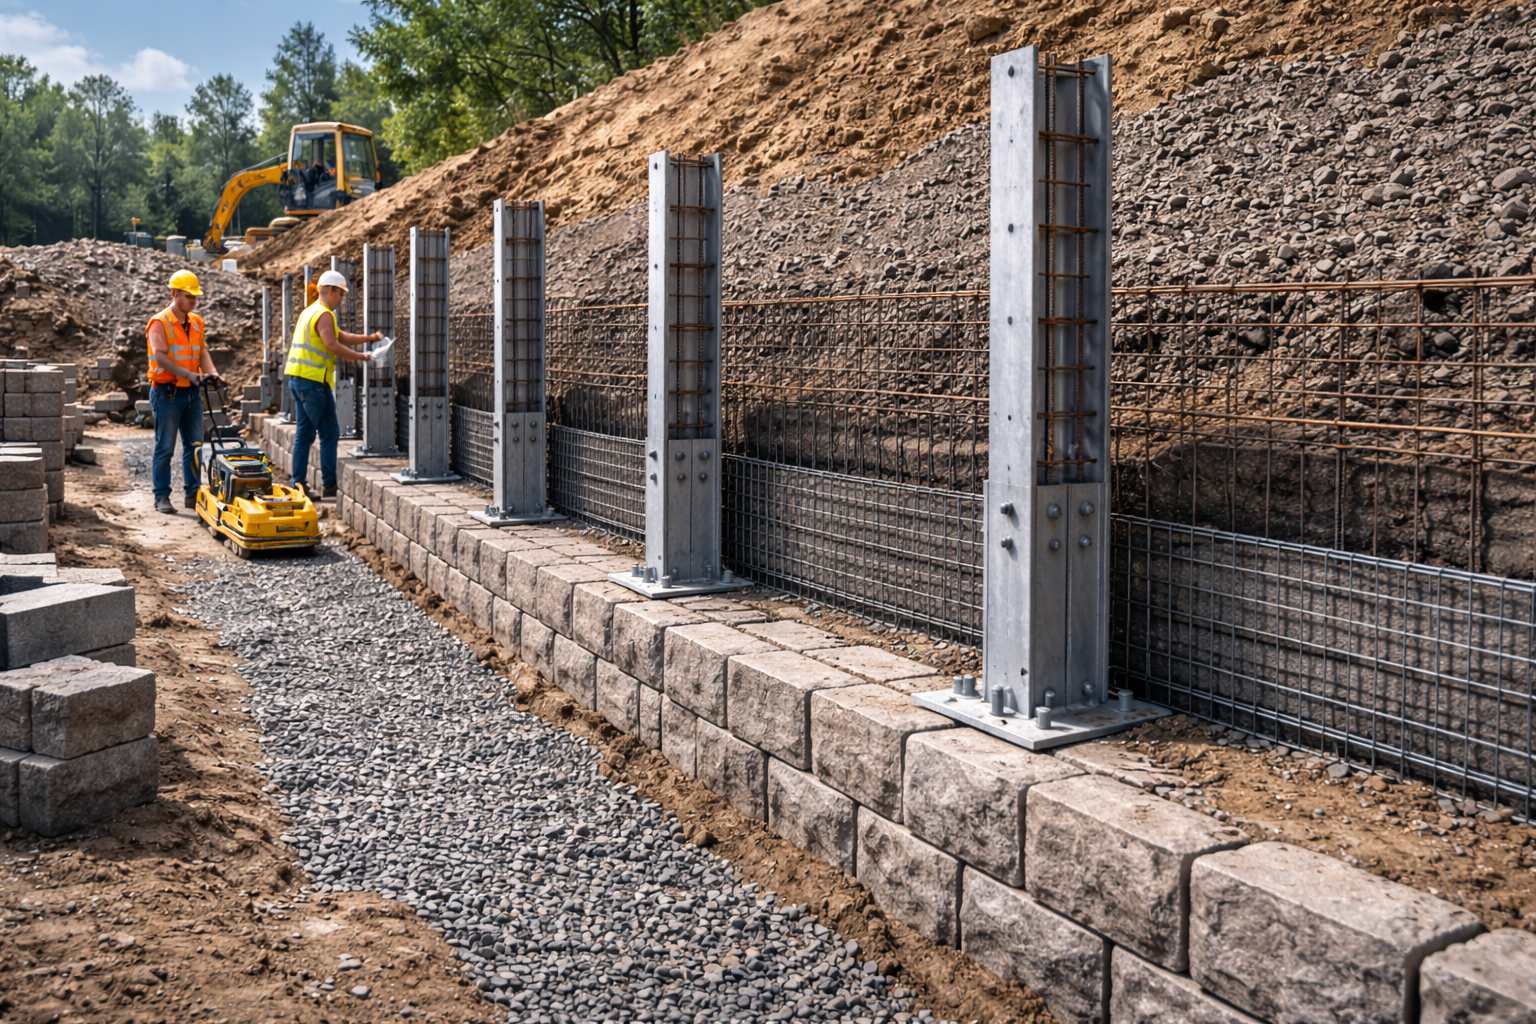
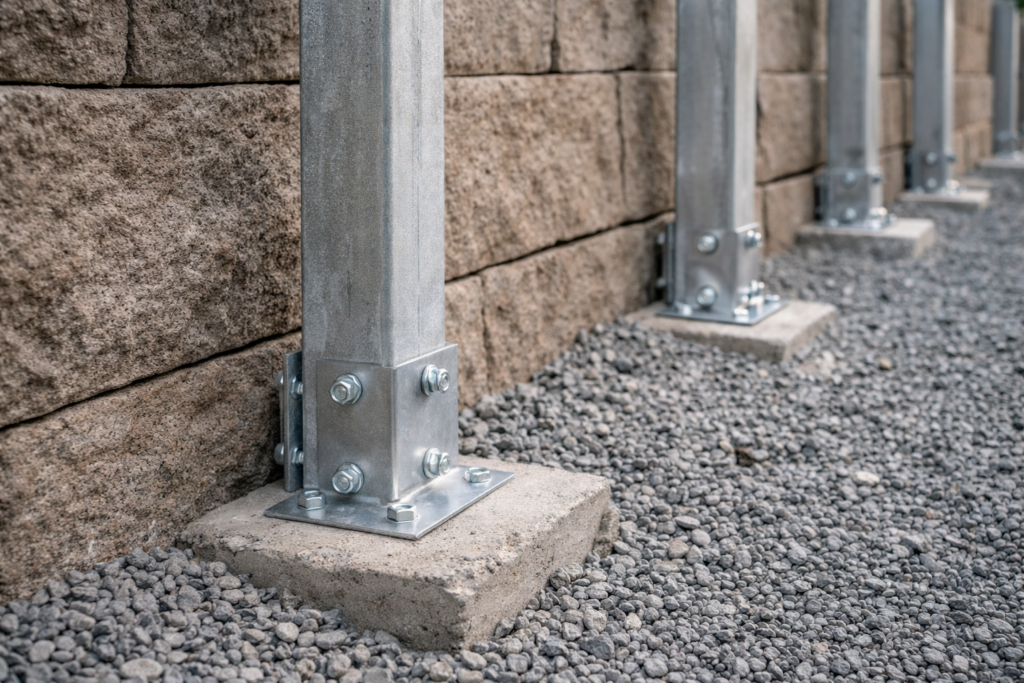
✅ Step 3: Set Steel Posts in Concrete (Keep Them Perfectly Plumb)
Steel posts must be installed straight and secure before sleepers go in. If posts lean or twist, the wall will look uneven and may lose strength over time.
How to set posts correctly:
- Place each steel post into the hole
- Use a spirit level to check it’s perfectly plumb on all sides
- Align it with the string line for a straight wall face
- Pour concrete around the post base and fill the hole
Curing time:
Allow concrete to cure for 24–48 hours before loading the posts with sleepers.
📌 Tip: Use quick-set concrete if you want to keep building on the same day—but still confirm it has set firmly before adding weight.
✅ Step 4: Install Sleepers Between Steel Posts
Once posts are secure, you can start building the wall structure by inserting sleepers.
How sleeper installation works:
- Slide sleepers into the H-channel or C-channel slots
- Ensure each sleeper sits flush and straight
- Check level as you go to keep the wall uniform
If using timber sleepers:
- You may need to screw or bolt sleepers to the steel posts
- Use treated timber rated for ground contact (H4 or higher)
📌 Tip: Check alignment every few sleepers—small errors become big problems by the time you reach the top.
✅ Step 5: Install a Drainage System Behind the Wall (Critical Step)
Drainage is one of the most important parts of retaining wall construction. Even a strong wall can fail if water pressure builds up behind it.
Basic retaining wall drainage setup:
- Lay an ag pipe behind the base of the wall
- Ensure it has the correct fall (slope) so water flows out
- Cover the pipe with free-draining gravel or scoria
- Wrap with geofabric to prevent silt clogging the drainage layer
📌 Drainage is critical: Without it, hydrostatic pressure can push the wall forward, causing leaning, cracking, or collapse.
✅ Step 6: Backfill the Wall (Do It Slowly and Correctly)
Backfilling the wall properly helps lock everything in place and reduces movement over time.
How to backfill correctly:
- Backfill in layers of 100–200mm at a time
- Use gravel, crushed rock, or soil (depending on your drainage design)
- Compact each layer before adding the next
- Ensure the top layer is graded to direct water away from the wall
📌 Tip: Don’t dump heavy soil loads behind the wall all at once—this can shift posts and create uneven pressure.
Common Mistakes to Avoid (Retaining Wall Failure Triggers)
Avoiding these mistakes can save you thousands in repairs:
❌ Poor drainage behind the wall
❌ Using untreated timber in contact with soil
❌ Not allowing concrete to cure before loading posts
❌ Misaligned steel posts (causes a wavy, uneven wall)
❌ Skipping council permits or engineering for high walls
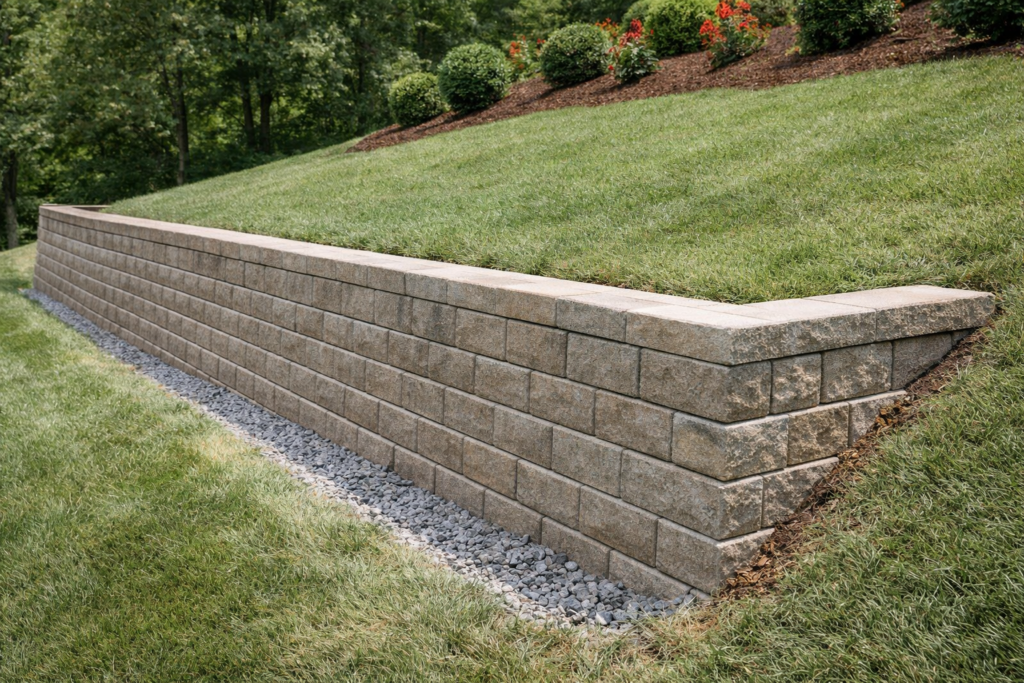
Final Thoughts: Steel-Supported Retaining Walls Last Longer
Building a retaining wall with steel supports delivers serious strength, long-term durability, and clean alignment, especially in tough Australian conditions. When installed correctly—with proper drainage, solid footings, and quality materials—steel-supported retaining walls can last 20–50 years or more with minimal maintenance. Learn more about the factors that affect steel durability.
Ready to Build a Strong, Long-Lasting Retaining Wall?
Don’t leave your retaining wall’s strength to chance — supercharge it with high-quality steel supports for retaining walls and expert design from the team at Super Steel Australia. Whether you’re planning a garden wall, driveway retaining wall, or large landscape project, their premium steel posts and structural steel solutions deliver the durability, corrosion resistance, and load-bearing performance your wall needs.
👉 Visit Super Steel Australia today to explore steel post options, get a custom quote, and secure professional support for your next retaining wall build.
Build stronger. Build smarter. Build with Super Steel AUS.